
So today it is raining and I have some time to investigate my options for solar power optimization. With fall approaching I am in a unique situation where the foliage is still on the trees but the angle of the sun has fallen lower on the horizon creating many hours less of full sun on my panel array. The morning doesn't light them until after 9am and it becomes again shadowed around 3:30pm. First I need to revisit what it is I have and recall the specifications. I was able to find an old Amazon.com listing to retrieve information on size and electrical specifications here: SEC Monocrystalline Efficiency Module 160WATT
 This is a closeup of the panel specifications (I bought 4 panels) you can click on any of the images in this page to see them larger
&
Don't worry, any links will open in a new window if you wanted to try any of the cool website tools...
This is a closeup of the panel specifications (I bought 4 panels) you can click on any of the images in this page to see them larger
&
Don't worry, any links will open in a new window if you wanted to try any of the cool website tools...I also bought some standard 12 Volt outdoor wire. Here is a link to a current offering of the same company: FIRMERST Low Voltage Outdoor Landscape Lighting
 I got two of them to run 2 conductors in parallel with one cable of two conductors as the [+] positive and the other 100' as the [-] negative from the solar panels to the solar charge controller. Note that they can handle up to 300 volts per conductor when used as a single [+] & [-] cable and that they are both outdoor UV rated and can even be buried in shallow ground.
From there I needed to figure out the amount of line drop over the roughly 90' between the solar array and the charge controller for the wire run. I found a handy website that can figure all that out in a snap. It can even figure out the AWG equivalent for a mixed batch of wire sizes making it quite the handy tool!
So here's a closeup of the output telling me my [2] 12 AWG conductors equate to a single 9 AWG wire:
I got two of them to run 2 conductors in parallel with one cable of two conductors as the [+] positive and the other 100' as the [-] negative from the solar panels to the solar charge controller. Note that they can handle up to 300 volts per conductor when used as a single [+] & [-] cable and that they are both outdoor UV rated and can even be buried in shallow ground.
From there I needed to figure out the amount of line drop over the roughly 90' between the solar array and the charge controller for the wire run. I found a handy website that can figure all that out in a snap. It can even figure out the AWG equivalent for a mixed batch of wire sizes making it quite the handy tool!
So here's a closeup of the output telling me my [2] 12 AWG conductors equate to a single 9 AWG wire:
 This is the link to the above website: Combined Wire Gauge Calculator
Now, on to the solar charge controller: Make Sky Blue 60a MPPT solar charge controller
This is the link to the above website: Combined Wire Gauge Calculator
Now, on to the solar charge controller: Make Sky Blue 60a MPPT solar charge controller
 So how much is this 60 Amp unit able to handle for input? Time to peek into manual:
 Since I'm only concerned with 1 kilowatt or less I can focus on the lower end of the scale. From there, I am already setup with 12v but I can see that adding another two panels will either increase my voltage above 80 volts or my wattage above 720 watts so I circled those two target areas in red.
Here's where I can begin to calculate my voltage drop using a calculator from this site: voltage drop calculator
This is what perfect conditions should render as input to my charge controller having all four panels in series then run through a 9 wire equivalent:
Since I'm only concerned with 1 kilowatt or less I can focus on the lower end of the scale. From there, I am already setup with 12v but I can see that adding another two panels will either increase my voltage above 80 volts or my wattage above 720 watts so I circled those two target areas in red.
Here's where I can begin to calculate my voltage drop using a calculator from this site: voltage drop calculator
This is what perfect conditions should render as input to my charge controller having all four panels in series then run through a 9 wire equivalent:
 So all is well with the working voltage and wattage although using the higher voltage to reduce line drop between the PV panels and the charge controller does make the controller less efficient because 72.52 volts is over six times the voltage of the battery and note the manual said efficiency is best when the PV array input is 1.5-2 times the battery voltage...
So with one efficiency issue found above, let's see how we fare with the max voltage and wattage possible as the manual requires. For this measurement we will need to use the VOC voltage:
So all is well with the working voltage and wattage although using the higher voltage to reduce line drop between the PV panels and the charge controller does make the controller less efficient because 72.52 volts is over six times the voltage of the battery and note the manual said efficiency is best when the PV array input is 1.5-2 times the battery voltage...
So with one efficiency issue found above, let's see how we fare with the max voltage and wattage possible as the manual requires. For this measurement we will need to use the VOC voltage:
 Well well, it seems as though I am already outside of allowable limitation of the controller with an over voltage potential as VOC @ (22.59 x 4)=90.36v @ 1.5% line drop is still above 80v at 89.01 volts... That's not good...
 So I am going to have to change my solar array setup whether I increase wattage or not.
It's shame to need to change what I built only around six months ago. I even added a water collection system under them.
So I am going to have to change my solar array setup whether I increase wattage or not.
It's shame to need to change what I built only around six months ago. I even added a water collection system under them.
 While this would net me the same wattage at the panels my voltage drop down the line would be pretty bad because the amperage would double while the voltage halved.
Fortunately the upgrade of two new panels would net me another 18-22 volts to reduce that should I jump up to two parallel rows of three panels in series.
proposed setup panels x6 @ 2(x3) min:
While this would net me the same wattage at the panels my voltage drop down the line would be pretty bad because the amperage would double while the voltage halved.
Fortunately the upgrade of two new panels would net me another 18-22 volts to reduce that should I jump up to two parallel rows of three panels in series.
proposed setup panels x6 @ 2(x3) min:
 proposed setup panels x6 @ 2(x3) max:
 Seems like this would be the way to go for the next iteration with the PV:
 It is worthy to note though that I needed to jump up to a 24v battery system because the wattage is now exceeding the input limitations of the charge controller...
Here's a Recap for so far:
12v setup is already out of spec from PV Voc over max.
24v setup will be needed to play with more panels... or can I get 2 @50watt?
Nah, I'm already over the rated specs for input of the recommended voltage and wattage at open circuit...
It is worthy to note though that I needed to jump up to a 24v battery system because the wattage is now exceeding the input limitations of the charge controller...
Here's a Recap for so far:
12v setup is already out of spec from PV Voc over max.
24v setup will be needed to play with more panels... or can I get 2 @50watt?
Nah, I'm already over the rated specs for input of the recommended voltage and wattage at open circuit...
 Having two of these will allow my system to throw the charge from high batteries to low batteries at 10 amps or 120-150 watts which will aid not only in battery life since the 24v system will not equalize on its own.
Also due to the fact that I am using a 12v inverter because all the fanciful items I purchased were advertised well over their rating!
If needed I can purchase another pair here: Battery Equalizer Voltage Balancer for 24V
During the warmer seasons I can potentially even use these for heavy equalization to prevent lopsided drain while running the AC. 20 amps would be up to 300 watts which is likely more than I'd need to maintain the 454 watt draw when the AC compressor kicks on...
I will further require 2 more panels of equal specs but the company, Solar Energy Central, no longer sells them.
I will need to find 2 panels of similar wattage that have nearly identical working voltage and current.
Here's the one I found with the closest output curves and voltages:
Having two of these will allow my system to throw the charge from high batteries to low batteries at 10 amps or 120-150 watts which will aid not only in battery life since the 24v system will not equalize on its own.
Also due to the fact that I am using a 12v inverter because all the fanciful items I purchased were advertised well over their rating!
If needed I can purchase another pair here: Battery Equalizer Voltage Balancer for 24V
During the warmer seasons I can potentially even use these for heavy equalization to prevent lopsided drain while running the AC. 20 amps would be up to 300 watts which is likely more than I'd need to maintain the 454 watt draw when the AC compressor kicks on...
I will further require 2 more panels of equal specs but the company, Solar Energy Central, no longer sells them.
I will need to find 2 panels of similar wattage that have nearly identical working voltage and current.
Here's the one I found with the closest output curves and voltages:
 It's a polycrystalline panel so it will be aesthetically different but I can't believe how close the working voltages and current are to the ones I've already got!
They do offer a poly panel for only a couple of bucks more that is similar in power curve but slightly over in all three categories: wattage, current, and voltage.
It's a polycrystalline panel so it will be aesthetically different but I can't believe how close the working voltages and current are to the ones I've already got!
They do offer a poly panel for only a couple of bucks more that is similar in power curve but slightly over in all three categories: wattage, current, and voltage.
 Here's a link to Rich Solar and an image of the two offerings:
I'm seriously leaning towards the 160 watt poly panel since the specs are so close but for only another $20 I could have a consistent look to my array.
Please feel free to reach out and give me your opinion as to if you would choose looks, and money, of the 170 watt panel over electrical specifications matching so closely on the other...
Here's a link to Rich Solar and an image of the two offerings:
I'm seriously leaning towards the 160 watt poly panel since the specs are so close but for only another $20 I could have a consistent look to my array.
Please feel free to reach out and give me your opinion as to if you would choose looks, and money, of the 170 watt panel over electrical specifications matching so closely on the other...


Here's a short video I made from receiving the panels to the finished product:
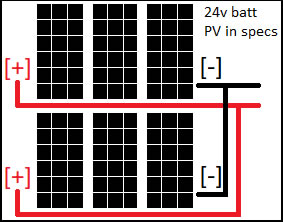
But I will need to split the panels from being a series of four into a pair of parallel couples in series to get the array within the specs the charge controller was designed for. Thankfully it will only require changing the wires and not tearing apart the whole thing!


I had the system setup as 24v upon first building it but went back to 12v due to the issues equalization presented.
Here's a short clip about that issue.
So to build a 24v system I will need to get at least one more battery equalizer:


Comments
Post a Comment